Omnet++ Samples 学习 1 - TicToc 练习汇总
官方 Tictoc Tutorials 链接:Introduction - OMNeT++ Technical Articles
国内比较好的翻译链接:omnet++ - 随笔分类 - ShineLe - 博客园
Tictoc 1
Derive the Txc1 class from cSimpleModule. In the Tictoc1 network, both the
ticandtocmodules are Txc1 objects, created by OMNeT++ at the beginning of the simulation.
一切都从新手村开始,在最开始的例子里,我们首先要了解 Tictoc 仿真的大致框架。
-
Tictoc.ned包含 tictoc module 以及 network 的定义
-
tictoc.cc&tictoc.h每个 module 的功能实现
-
ompetpp.ini仿真的启动文件,也会声明和初始化一些 module 或 network 中的参数
太过细节的不再过多赘述了,可以自己查阅官方链接。目前只需要知道每个 module 实现都要继承 cSimpleModule 模块并 override 两个基本函数 initlaize() 和 handleMessage() ,如下所示
1 | class Txc1 : public cSimpleModule |
handleMessage 函数的功能是对收到的 Message 作出反应,在这里是直接再向外发送一个 Message,最后效果便像是 ping-pang 一样互发。
在 initialize() 中可以看到调用 Omnet++ 的 API 来获取当前 module 的name
1 | void Txc1::initialize() |
也即确保第一发包是从 tic module 开始的。
Tictoc 2
In this step we add some debug messages to Txc1. When you run the simulation in the OMNeT++ Qtenv GUI, the log will appear in the bottom panel of the Qtenv window. To see only the log from
ticortocalone, go into them by double-clicking their icons, and the bottom panel will be filtered accordingly. (You can go back with the up arrow button on the toolbar.)
相比 Tictoc1 增加了 debug 信息
Tictoc 3
In this class we add a counter, and delete the message after ten exchanges.
-
Initialize()函数中添加了 WATCH 函数,可以实时在 Qtenv 显示 counter 的值。1
2
3
4
5
6
7
8
9
10
11
12
13
14
15
16
17
18void Txc3::initialize()
{
// Initialize counter to ten. We'll decrement it every time and delete
// the message when it reaches zero.
counter = 10;
// The WATCH() statement below will let you examine the variable under
// Qtenv. After doing a few steps in the simulation, click either
// `tic' or `toc', and you'll find its `counter' variable and its
// current value displayed in the inspector panel (bottom left).
WATCH(counter);
if (strcmp("tic", getName()) == 0) {
EV << "Sending initial message\n";
cMessage *msg = new cMessage("tictocMsg");
send(msg, "out");
}
}
Tictoc 4
In this step you’ll learn how to add input parameters to the simulation: we’ll turn the “magic number” 10 into a parameter.
-
将仿真参数添加在 ned 文件中进行设置,避免在 cc 文件中进行设置绑定。首先在 ned 文件中对变量进行定义,可以通过 default 变量设置默认值。
1
2
3
4
5
6
7
8
9
10simple Txc4
{
parameters:
bool sendMsgOnInit = default(false); // whether the module should send out a message on initialization
int limit = default(2); // another parameter with a default value
@display("i=block/routing");
gates:
input in;
output out;
}然后在 cc 文件中通过
par()函数进行变量读取,如下所示1
2
3
4
5
6
7
8
9
10
11
12
13
14void Txc4::initialize()
{
// Initialize the counter with the "limit" module parameter, declared
// in the NED file (tictoc4.ned).
counter = par("limit");
// we no longer depend on the name of the module to decide
// whether to send an initial message
if (par("sendMsgOnInit").boolValue() == true) {
EV << "Sending initial message\n";
cMessage *msg = new cMessage("tictocMsg");
send(msg, "out");
}
}
Tictoc 5
Same as Txc4. This module will be the base of the Tic and Toc types.
相比 Tictoc 4,仅在 ned 文件中进行了修改,让其继承一个特定的 module,可以更定制化地进行修改。
1 | simple Txc5 |
Tictoc 6
In the previous models,
ticandtocimmediately sent back the received message. Here we’ll add some timing: tic and toc will hold the message for 1 simulated second before sending it back. In OMNeT++ such timing is achieved by the module sending a message to itself.Such messages are called
self-messages(but only because of the way they are used, otherwise they are completely ordinary messages) or events. Self-messages can be “sent” with thescheduleAt()function, and you can specify when they should arrive back at the module. We leave out the counter, to keep the source code small.
-
引入 self-messages 的概念,不同于接收到的其他类型 Message,它是 module 自己产生的,可以自己设定产生的逻辑,用来定时发送,又或者对其他 Message 的接收作出反应等。
其通过
scheduleAt()函数来设置发送,如下所示1
2
3
4
5
6
7
8
9
10
11
12
13
14
15
16
17void Txc6::initialize()
{
// Create the event object we'll use for timing -- just any ordinary message.
event = new cMessage("event");
// No tictoc message yet.
tictocMsg = nullptr;
if (strcmp("tic", getName()) == 0) {
// We don't start right away, but instead send an message to ourselves
// (a "self-message") -- we'll do the first sending when it arrives
// back to us, at t=5.0s simulated time.
EV << "Scheduling first send to t=5.0s\n";
tictocMsg = new cMessage("tictocMsg");
scheduleAt(5.0, event);
}
}在这里设置发送包消息仍为 cMessage 类型
-
handleMessage() 针对 self-messages 进行修改
1
2
3
4
5
6
7
8
9
10
11
12
13
14
15
16
17
18
19
20
21
22
23
24void Txc6::handleMessage(cMessage *msg)
{
// There are several ways of distinguishing messages, for example by message
// kind (an int attribute of cMessage) or by class using dynamic_cast
// (provided you subclass from cMessage). In this code we just check if we
// recognize the pointer, which (if feasible) is the easiest and fastest
// method.
if (msg == event) {
// The self-message arrived, so we can send out tictocMsg and nullptr out
// its pointer so that it doesn't confuse us later.
EV << "Wait period is over, sending back message\n";
send(tictocMsg, "out");
tictocMsg = nullptr;
}
else {
// If the message we received is not our self-message, then it must
// be the tic-toc message arriving from our partner. We remember its
// pointer in the tictocMsg variable, then schedule our self-message
// to come back to us in 1s simulated time.
EV << "Message arrived, starting to wait 1 sec...\n";
tictocMsg = msg;
scheduleAt(simTime()+1.0, event);
}
}增加了单独的 msg 类型判断,当收到 self-message 时发送 message 给其他模块;如果是其他模块发来的消息则制定 message 任务,延时 1s 后再发送 self-message 消息。
Tictoc 7
In this step we’ll introduce random numbers. We change the delay from 1s to a random value which can be set from the NED file or from omnetpp.ini. In addition, we’ll “lose” (delete) the packet with a small probability.
-
引入随机数,使用 Omnet++ 下 uniform 函数生成随机数,设置判断条件随机地删除收到的报文。这里可以算是最简单模拟了下实际环境的信道,可能随时出现丢包的情况。
uniform 函数如下图所示1
2
3
4
5
6
7/**
* Returns a random variate with uniform distribution in the range [a,b).
*
* @param a, b the interval, a<b
* @param rng index of the component RNG to use, see getRNG(int)
*/
virtual double uniform(double a, double b, int rng=0) const {return omnetpp::uniform(getRNG(rng), a, b);} -
增加
delay变量,在 ned 文件中进行设置,用于调整循环发送包的间隔。通过delay可以简单模拟报文处理的时延;
ned 文件设置为1
volatile double delayTime @unit(s); // delay before sending back message
cc 文件设置为
1
2
3
4
5
6
7
8// The "delayTime" module parameter can be set to values like
// "exponential(5)" (tictoc7.ned, omnetpp.ini), and then here
// we'll get a different delay every time.
simtime_t delay = par("delayTime");
EV << "Message arrived, starting to wait " << delay << " secs...\n";
tictocMsg = msg;
scheduleAt(simTime()+delay, event);
Tictoc 8
Let us take a step back, and remove random delaying from the code. We’ll leave in, however, losing the packet with a small probability. And, we’ll we do something very common in telecommunication networks: if the packet doesn’t arrive within a certain period, we’ll assume it was lost and create another one. The timeout will be handled using (what else?) a self-message.
基于通信中一个很常见的逻辑重新设计了本节 – 如果未在规定时间到达则默认该 packet 丢失,然后重新创建一个。下面是几个部分的变化
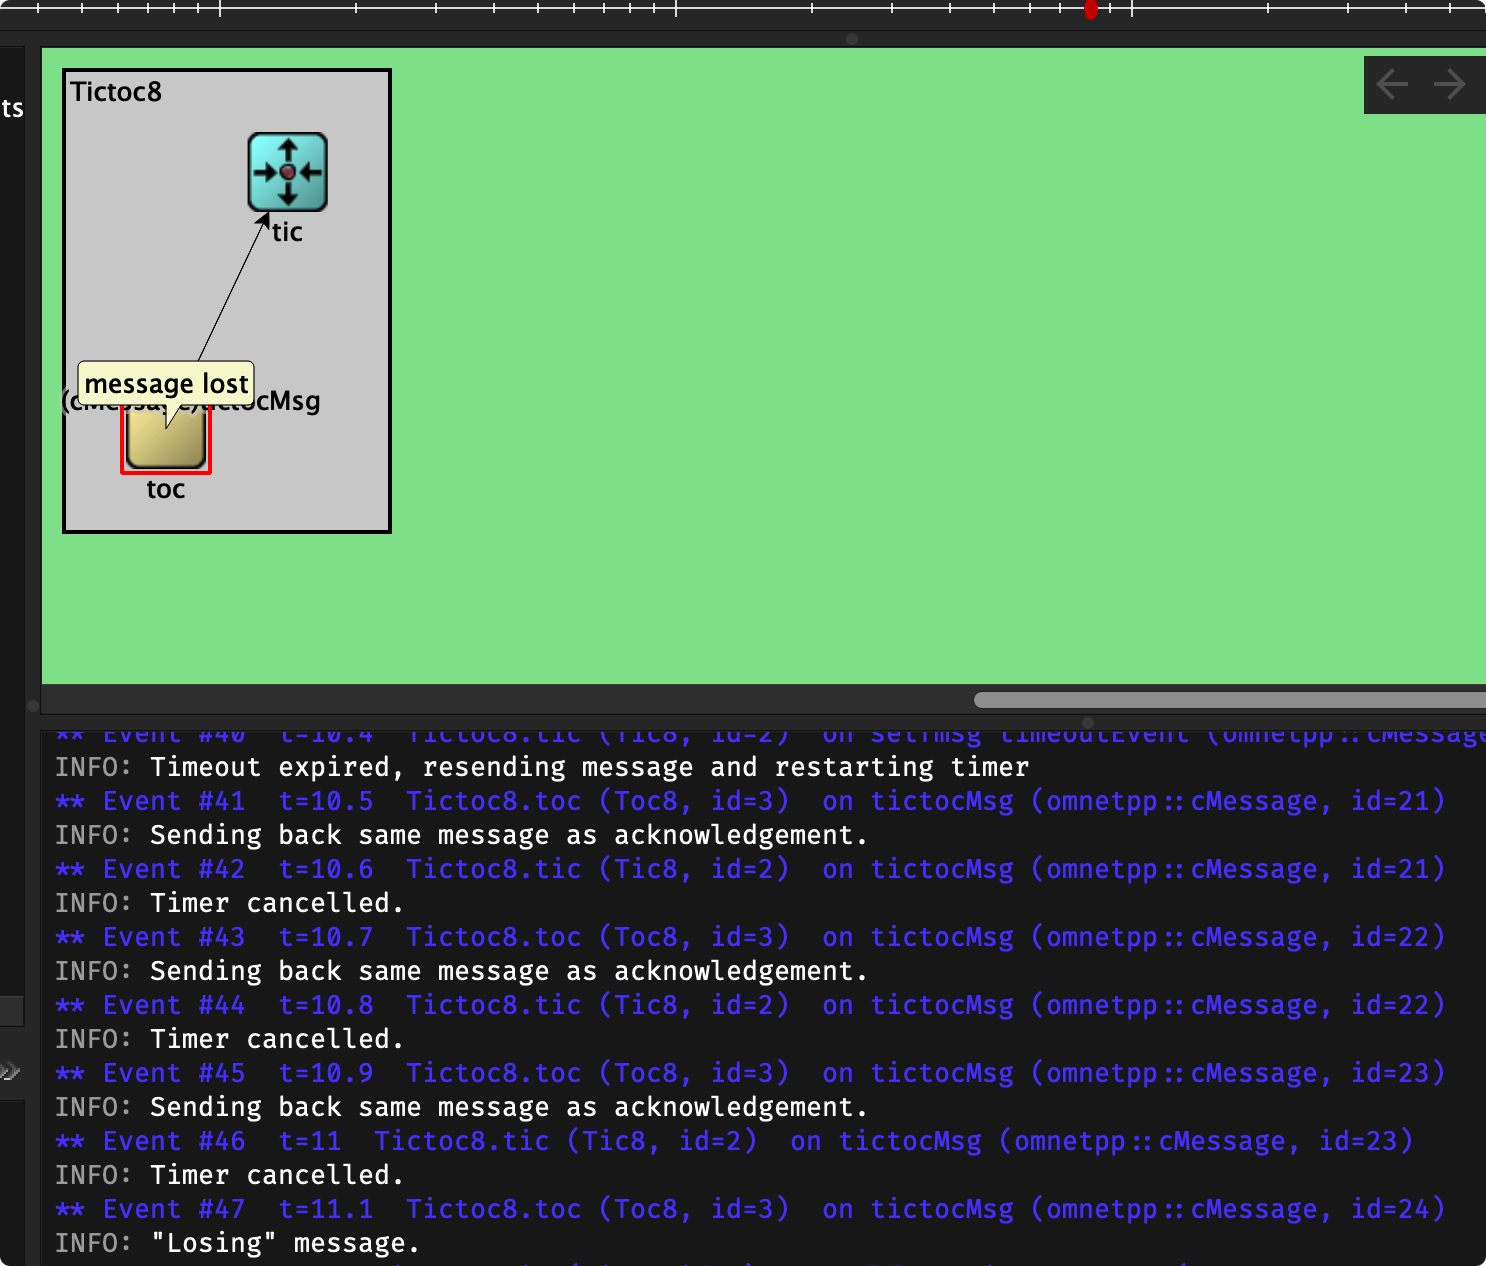
-
将 tic 和 toc 分开两部分,分别承担发送方和接收方的功能。tic 发送的报文,当 toc 收到后需要发回一个确认包(acknowledgement),并且有一定概率丢失接收的包(不再设置定时主动发送包,只被动发送)。
-
将前面一直使用的 self message(也可以理解为发包间隔 interval)修改为 timeout,仍然是在收包位置修改了判断逻辑 -> 如果收到 timeout 包,则说明没有在规定时间内收到对面发来的回复包(acknowledgement),于是重新发送 packet 并更新 timer 计时;如果收到了对面的回复包,则确定包发送成功。之后需要取消掉前面规划的 timeoutEvent,重新发送报文并更新 timeout 计时。
简单理解就是,收到 timeout 包运行丢包处理逻辑,收到 acknowledgement 包则正常运行下一次发包逻辑。
1
2
3
4
5
6
7
8
9
10
11
12
13
14
15
16
17
18
19
20
21
22
23void Tic8::handleMessage(cMessage *msg)
{
if (msg == timeoutEvent) {
// If we receive the timeout event, that means the packet hasn't
// arrived in time and we have to re-send it.
EV << "Timeout expired, resending message and restarting timer\n";
cMessage *newMsg = new cMessage("tictocMsg");
send(newMsg, "out");
scheduleAt(simTime()+timeout, timeoutEvent);
}
else { // message arrived
// Acknowledgement received -- delete the received message and cancel
// the timeout event.
EV << "Timer cancelled.\n";
cancelEvent(timeoutEvent);
delete msg;
// Ready to send another one.
cMessage *newMsg = new cMessage("tictocMsg");
send(newMsg, "out");
scheduleAt(simTime()+timeout, timeoutEvent);
}
} -
添加一种新的显示方法(在 toc handleMessage 下),可以运行的图标上直接显示提示字符串,如上图所示。
1
bubble("message lost"); // making animation more informative...
Tictoc 9
In the previous model we just created another packet if we needed to retransmit. This is OK because the packet didn’t contain much, but in real life it’s usually more practical to keep a copy of the original packet so that we can re-send it without the need to build it again.
-
相比 Tictoc 8 增加了
sendCopyOf(message)功能,对比直接发送的过程如下Current
1
2
3
4
5
6
7
8
9
10
11
12
13
14
15cMessage *Tic9::generateNewMessage()
{
// Generate a message with a different name every time.
char msgname[20];
sprintf(msgname, "tic-%d", ++seq);
cMessage *msg = new cMessage(msgname);
return msg;
}
void Tic9::sendCopyOf(cMessage *msg)
{
// Duplicate message and send the copy.
cMessage *copy = (cMessage *)msg->dup();
send(copy, "out");
}Before
1
2cMessage *newMsg = new cMessage("tictocMsg");
send(newMsg, "out");个人觉得这里可能体现的不是很明显,new cMessage(msgname) 和 (cMessage *)msg->dup() 对比感觉差别并不是很大。不过原作者也说过 ”but in real life it’s usually more practical to keep a copy of the original packet“ ,在实际项目中确实可能构建包的开销很大,这里通过
sendCopyOf函数为后续的功能提供了封装接口。补充下里面提到的这个接口
1
2
3
4
5
6
7/**
* Creates and returns an exact copy of this object, except for the
* message ID (the clone is assigned a new ID). Note that the message
* creation time is also copied, so clones of the same message object
* have the same creation time. See cObject for more details.
*/
virtual cMessage *dup() const override {return new cMessage(*this);}
Tictoc 10
Let’s make it more interesting by using several (n) `tic’ modules, and connecting every module to every other. For now, let’s keep it simple what they do: module 0 generates a message, and the others keep tossing it around in random directions until it arrives at module 2.
和之前的例程差别很大,这个例子第一次引入了多模块 vector 以及 forward message 的概念,下面来看下
-
多模块 vector
1
2
3
4
5
6
7
8
9
10
11
12
13
14
15
16
17
18
19
20
21
22
23
24
25
26
27
28
29
30
31
32simple Txc10
{
parameters:
@display("i=block/routing");
gates:
input in[]; // declare in[] and out[] to be vector gates
output out[];
}
network Tictoc10
{
@display("bgb=364,261");
submodules:
tic[6]: Txc10 {
@display("p=165,119");
}
connections:
tic[0].out++ --> { delay = 100ms; } --> tic[1].in++;
tic[0].in++ <-- { delay = 100ms; } <-- tic[1].out++;
tic[1].out++ --> { delay = 100ms; } --> tic[2].in++;
tic[1].in++ <-- { delay = 100ms; } <-- tic[2].out++;
tic[1].out++ --> { delay = 100ms; } --> tic[4].in++;
tic[1].in++ <-- { delay = 100ms; } <-- tic[4].out++;
tic[3].out++ --> { delay = 100ms; } --> tic[4].in++;
tic[3].in++ <-- { delay = 100ms; } <-- tic[4].out++;
tic[4].out++ --> { delay = 100ms; } --> tic[5].in++;
tic[4].in++ <-- { delay = 100ms; } <-- tic[5].out++;
}首先看这里的 gates 描述,
input in[]和output out[]代表多个接口,然后 submodules 中也相应修改,需要明确指定模块的个数,然后connections里按照数字大小依次连接各个模块。当这里使用 vector 后,在代码中可以通过
getIndex()函数来获取到模块的 ID 从而针对性地进行处理。1
2
3
4
5/**
* Returns the index of the module in a module vector. If the module is not
* member of a module vector, an exception is thrown.
*/
int getIndex() const; -
forward message
这次初始化从 0 模块开始发送,然后再从 3 模块等待接收
1
2
3
4
5
6
7
8
9
10
11
12
13
14
15
16
17
18
19
20
21
22
23
24
25
26
27
28
29
30
31void Txc10::initialize() {
if (getIndex() == 0) {
// Boot the process scheduling the initial message as a self-message.
char msgname[20];
sprintf(msgname, "tic-%d", getIndex());
cMessage *msg = new cMessage(msgname);
scheduleAt(0.0, msg);
}
}
void Txc10::handleMessage(cMessage *msg) {
if (getIndex() == 3) {
// Message arrived.
EV << "Message " << msg << " arrived.\n";
delete msg;
}
else {
// We need to forward the message.
forwardMessage(msg);
}
}
void Txc10::forwardMessage(cMessage *msg) {
// In this example, we just pick a random gate to send it on.
// We draw a random number between 0 and the size of gate `out[]'.
int n = gateSize("out");
int k = intuniform(0, n-1);
EV << "Forwarding message " << msg << " on port out[" << k << "]\n";
send(msg, "out", k);
}下面介绍下 forwardMessage 里的两个函数
-
gateSize("out")1
2
3
4
5
6
7
8/**
* Returns the size of the gate vector with the given name. Gate names with
* the "$i" or "$o" suffix are also accepted. Throws an error if there is
* no such gate, or it is not a gate vector.
*
* @see cGate::getVectorSize()
*/
virtual int gateSize(const char *gatename) const; -
Intuniform(0, n-1)1
2
3
4
5
6
7
8/**
* Returns a random integer with uniform distribution in the range [a,b],
* inclusive. (Note that the function can also return b.)
*
* @param a, b the interval, a<=b
* @param rng index of the component RNG to use, see getRNG(int)
*/
virtual int intuniform(int a, int b, int rng=0) const {return omnetpp::intuniform(getRNG(rng), a, b);};
-
这里也第一次出现三个参数的 send(msg, "out", k),k 代表着发送到连接的第几个 module,也只有连接多 个 module 时才能使用。
Tictoc 11-12
Let’s make it more interesting by using several (n) `tic’ modules, and connecting every module to every other. For now, let’s keep it simple what they do: module 0 generates a message, and the others keep tossing it around in random directions until it arrives at module 2.
对比 Tictoc 10,11 和 12 在代码实现上没有差别,仅在 ned 文件上更改了实现,变化如下
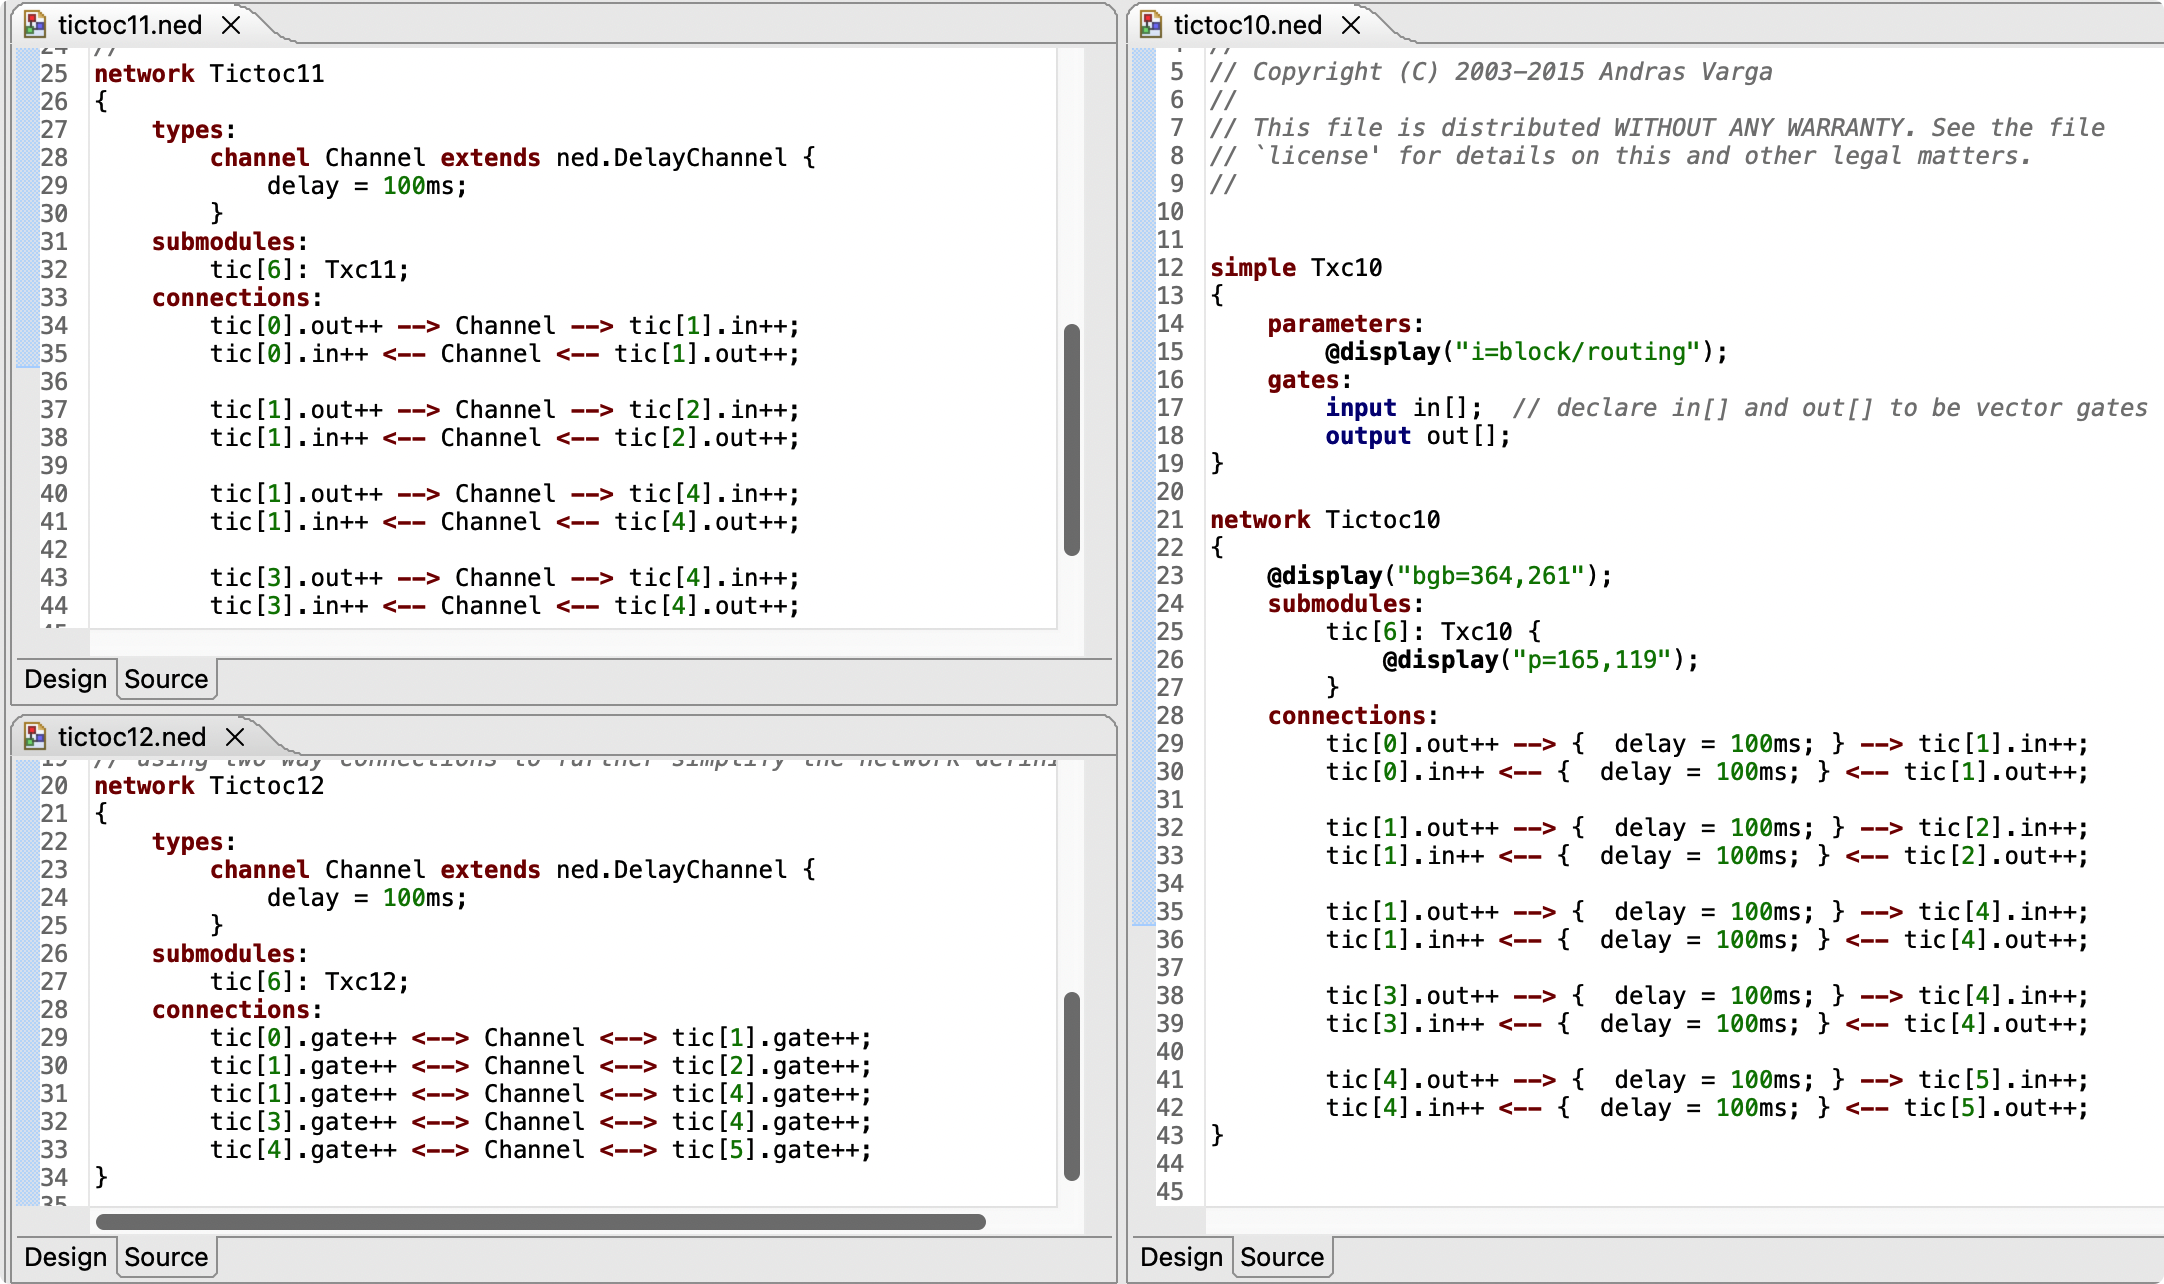
这里的 channel 暂时没有搜索相关资料,后续补充。
Tictoc 13
In this step the destination address is no longer node 2 – we draw a random destination, and we’ll add the destination address to the message. The best way is to subclass cMessage and add destination as a data member. Hand-coding the message class is usually tiresome because it contains a lot of boilerplate code, so we let OMNeT++ generate the class for us.
The message class specification is intictoc13.msg–tictoc13_m.hand.ccwill be generated from this file automatically. To make the model execute longer, after a message arrives to its destination the destination node will generate another message with a random destination address, and so forth.
-
Tictoc 13 第一次引入了自定义 message 的概念,文件后缀为 .msg,在其中定义 message 的字段,然后其它的便不需要写了,直接交给 Omnet ++ 自行生成处理即可,当系统运行后会自动生成了类似“ 文件名_m.h 和文件名_m.cc” 的两个文件,其中包括了所有获取 message 内字段的接口(读取写入)。
1
2
3
4
5
6message TicTocMsg13
{
int source;
int destination;
int hopCount = 0;
} -
既然 Message 变为自定义的,那么 Handle Message 的方式也要相应发生改变。
1
2
3
4
5
6
7
8
9
10
11
12
13
14
15
16
17
18
19
20
21void Txc13::handleMessage(cMessage *msg)
{
TicTocMsg13 *ttmsg = check_and_cast<TicTocMsg13 *>(msg);
if (ttmsg->getDestination() == getIndex()) {
// Message arrived.
EV << "Message " << ttmsg << " arrived after " << ttmsg->getHopCount() << " hops.\n";
bubble("ARRIVED, starting new one!");
delete ttmsg;
// Generate another one.
EV << "Generating another message: ";
TicTocMsg13 *newmsg = generateMessage();
EV << newmsg << endl;
forwardMessage(newmsg);
}
else {
// We need to forward the message.
forwardMessage(ttmsg);
}
}可以看到处理报文的第一步首先要把收到的 msg 转换为自定义的 Message 的格式,这里个人有点不理解,如果 msg 本身不是自定义格式,那么转换会有什么结果呢?(可能需要再深入理解下 C++ 语法)
之后在判断语句位置可以看到 ttmsg 调用自定义 Message 的接口,格式大致就是getDestination()或者setDestination()。通过将 destination 包含在 Message 中,可以更加灵活地指定,避免代码和参数的过度耦合。从 generateMessage 函数改变也可以看到自定义 Message 是如何写入的。1
2
3
4
5
6
7char msgname[20];
sprintf(msgname, "tic-%d-to-%d", src, dest);
// Create message object and set source and destination field.
TicTocMsg13 *msg = new TicTocMsg13(msgname);
msg->setSource(src);
msg->setDestination(dest);
Tictoc 14
In this step we keep track of how many messages we send and received. and display it above the icon.
-
ned 和 msg 文件和之前没有多少变化,最主要地是增加了 WATCH 函数的使用,方便我们更清楚地感知系统的状态。
1
2
3
4
5
6
7
8
9
10
11
12
13
14
15
16void Txc14::initialize()
{
// Initialize variables
numSent = 0;
numReceived = 0;
WATCH(numSent);
WATCH(numReceived);
// Module 0 sends the first message
if (getIndex() == 0) {
// Boot the process scheduling the initial message as a self-message.
TicTocMsg14 *msg = generateMessage();
numSent++;
scheduleAt(0.0, msg);
}
}效果如下
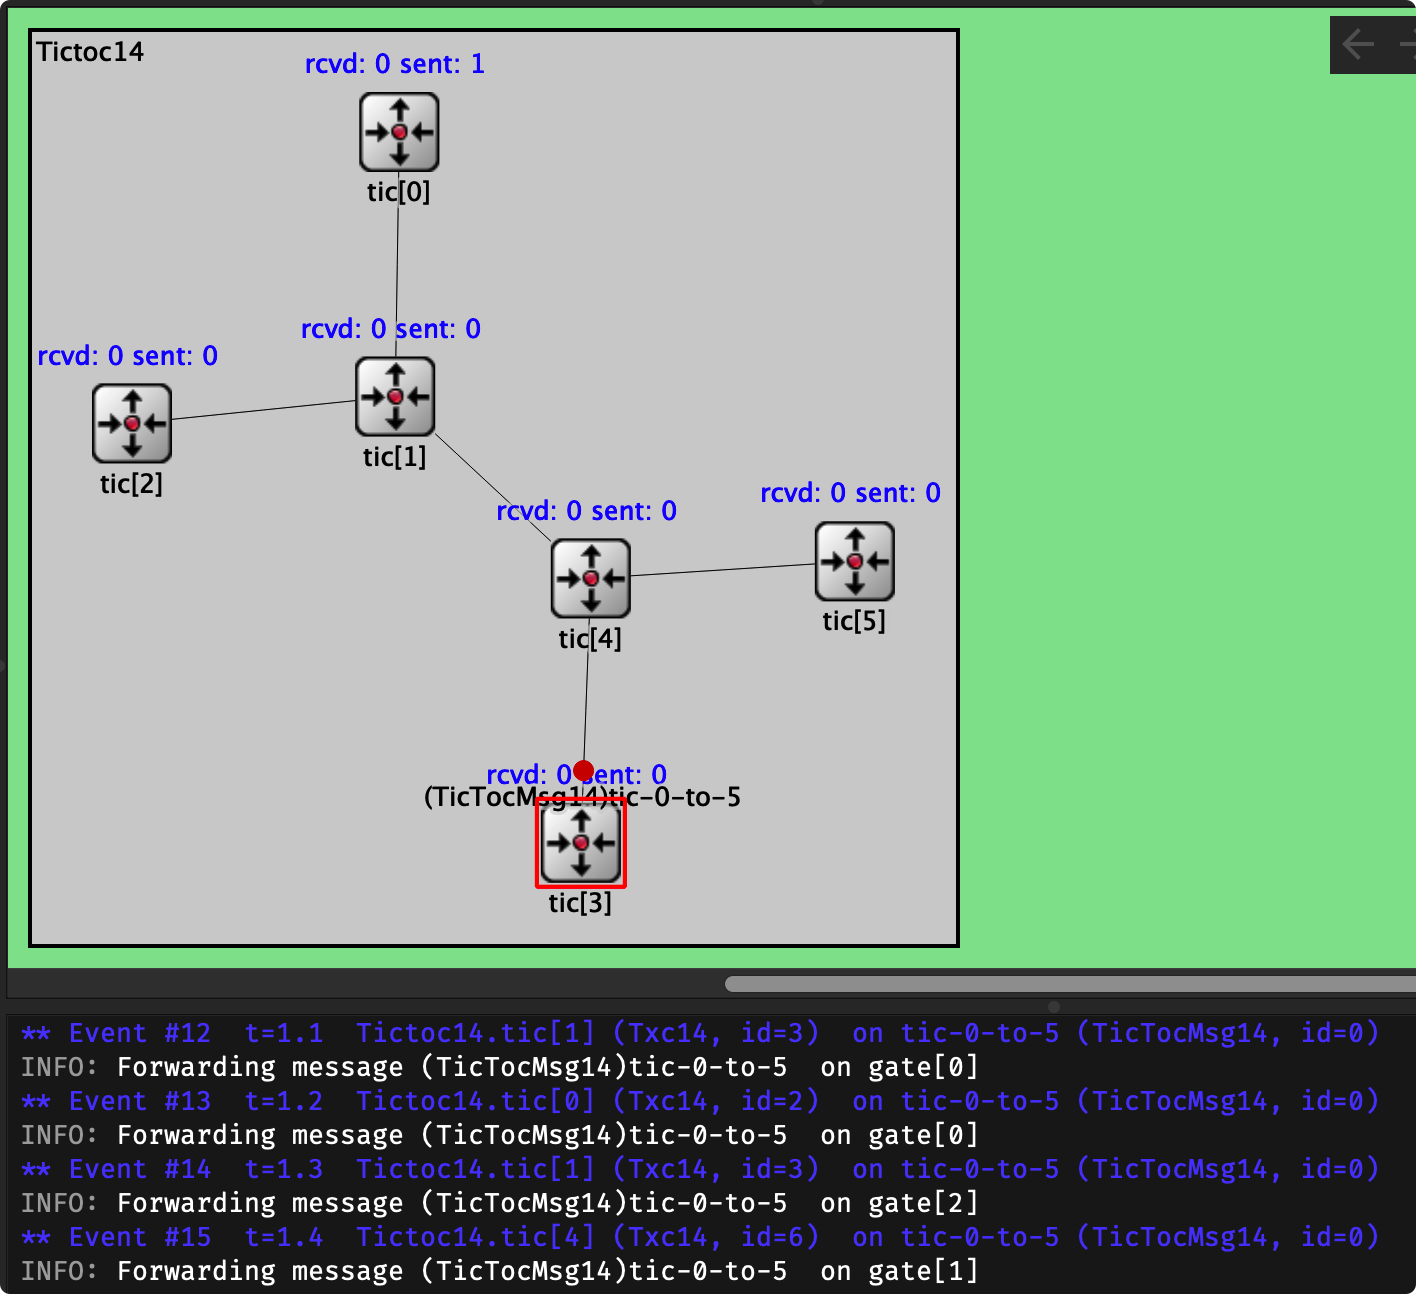
-
Override 系统的 refreshDisplay 函数,打印出上图的效果,关于这部分没有具体查阅资料,后续补上。
1
2
3
4
5
6void Txc14::refreshDisplay() const
{
char buf[40];
sprintf(buf, "rcvd: %ld sent: %ld", numReceived, numSent);
getDisplayString().setTagArg("t", 0, buf);
}
Tictoc 15
This model is exciting enough so that we can collect some statistics. We’ll record in output vectors the hop count of every message upon arrival. Output vectors are written into the omnetpp.vec file and can be visualized with the Plove program. We also collect basic statistics (min, max, mean, std.dev.) and histogram about the hop count which we’ll print out at the end of the simulation.
增加了数据统计的功能,对于后续的数据分析很重要。
-
首先要在 omnetpp.ini 中开启 record-evertlog,只有开启这个之后才能在代码中调用
recordScalar函数,用了录制收集特定的数据,在该模块中是在finish()函数中开启的调用。1
2
3[Tictoc15]
network = Tictoc15
record-eventlog = true -
在私有成员中加入统计属性的变量,关于这两个类型的具体介绍见 Omnet++ manual 第 7.9 节。
1
2cHistogram hopCountStats;
cOutVector hopCountVector;其使用之前首先要在
initlaize()中进行初始化1
2hopCountStats.setName("hopCountStats");
hopCountVector.setName("HopCount");调用方式
1
2
3
4
5
6
7
8int hopcount = ttmsg->getHopCount();
EV << "Message " << ttmsg << " arrived after " << hopcount << " hops.\n";
bubble("ARRIVED, starting new one!");
// update statistics.
numReceived++;
hopCountVector.record(hopcount);
hopCountStats.collect(hopcount);以及最后调用 finish 收尾
1
2
3
4
5
6
7
8
9
10
11
12
13
14
15void Txc15::finish()
{
// This function is called by OMNeT++ at the end of the simulation.
EV << "Sent: " << numSent << endl;
EV << "Received: " << numReceived << endl;
EV << "Hop count, min: " << hopCountStats.getMin() << endl;
EV << "Hop count, max: " << hopCountStats.getMax() << endl;
EV << "Hop count, mean: " << hopCountStats.getMean() << endl;
EV << "Hop count, stddev: " << hopCountStats.getStddev() << endl;
recordScalar("#sent", numSent);
recordScalar("#received", numReceived);
hopCountStats.recordAs("hop count");
}程序运行结束可以看到一个 results 文件夹,里面内容如下
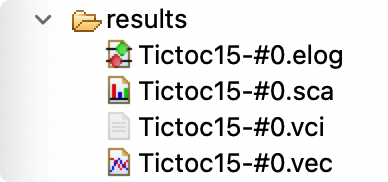
具体每个文件如何使用,可以查看如下 omnet++:官方文档翻译总结(五) - ShineLe - 博客园
Tictoc 16
The main problem with the previous step is that we must modify the model’s code if we want to change what statistics are gathered. Statistic calculation is woven deeply into the model code which is hard to modify and understand.
OMNeT++ 4.1 provides a different mechanism called ‘signals’ that we can use to gather statistics. First we have to identify the events where the state of the model changes. We can emit signals at these points that carry the value of chosen state variables. This way the C++ code only emits signals, but how those signals are processed are determined only by the listeners that are attached to them.
The signals the model emits and the listeners that process them can be defined in the NED file using the ‘signal’ and ‘statistic’ property. We will gather the same statistics as in the previous step, but notice that we will not need any private member variables to calculate these values. We will use only a single signal that is emitted when a message arrives and carries the hopcount in the message.
在 Tictoc 15 中
详见 omnet++:官方文档翻译总结(四) - ShineLe - 博客园
-
使用同一的接口 arrivalSignal 来替代之前的两个变量
Before1
2cHistogram hopCountStats;
cOutVector hopCountVector;Now
1
simsignal_t arrivalSignal;
通过这个接口避免了与特定的统计变量进行绑定,使其更加灵活。取而代之,原先的统计也相应地进行了修改。
Before1
2hopCountVector.record(hopcount);
hopCountStats.collect(hopcount);Now
1
2// send a signal
emit(arrivalSignal, hopcount);同时需要注意在使用 arrivalSignal 之前必须先注册所有的 signals,注册代码通常放在
initlaize()函数中。1
arrivalSignal = registerSignal("arrival");
-
由于我们不用保存任何数据,所以
finish()方法可以删去了。 -
最后是 ned 文件中定义 signal 的相关信息
1
2
3
4
5
6
7
8
9
10simple Txc16
{
parameters:
@signal[arrival](type="long");
@statistic[hopCount](title="hop count"; source="arrival"; record=vector,stats; interpolationmode=none);
@display("i=block/routing");
gates:
inout gate[];
}在该节中我们仍然是统计 hop count的信息(最大值、最小值、均值、总和等),所以让我们在本例中收集相同的数据。
source关键字指明了附加我们的统计数据的 signal;record关键字告诉我们需要如何处理收到的数据。本例中我们需要将每个值都保存到 vector file(vector关键字)中,此外还要统计上段中说到的那些统计信息(stats关键字)。NED文件写完之后,我们就完成了我们的 model。现在我们需要查看 tic[1] module 中关于hopCount的直方图,此外我们不需要记录tic 0,1,2的vector data。我们可以不用修改 C++ 和 NED 文件来实现添加直方图并且移除不需要的 vector 的目的,只需要打开 ini 文件并且修改统计数据的记录语句即可。如下所示
-
Omnetpp.ini修改1
2
3
4[Tictoc16]
network = Tictoc16
**.tic[1].hopCount.result-recording-modes = +histogram
**.tic[0..2].hopCount.result-recording-modes = -vector
Tictoc 17
官方没有注释
OMNET++可以在 canvas 上展示一系列的 figures,例如文本、几何图形、图像。这些figures可以是静态的,也可以根据仿真过程中发生的事件动态变化。本例中,我们展示了静态描述文本、动态显示hop count的文本。
-
在ned文件中创建figures,需要在parameters用@figure说明
1
2
3
4
5
6network Tictoc17
{
parameters:
@figure[description](type=text;pos=5,20;font=,,bold;
text="Random routing example - displaying last hop count");
@figure[lasthopcount](type=text;pos=5,35;text="last hopCount: N/A");这里创建了两个文本 figure,它们的名字是
description和lasthopcount,并且设置了它们的位置坐标。font 参数说明了文本字体,有三个分量——typeface, size, style。这三个分量中的每一个都可以略去,这样实际中会代之以默认值。本例中我们只是设置了字体的 style 为 bold。 -
默认情况下 lasthopcount 中的文本是静态的,但是当消息到达时需要修改它。要做到这一点,需要修改
handleMessage()函数1
2
3
4
5
6
7
8
9
10if(hasGUI()){
char label[50];
//把last hop count写为string形式
sprintf(label,"last hopCount = %d",hopcount);
//定义一个指向figure的指针
cCanvas * canvas = getParentModule()->getCanvas();
cTextFigure *textFigure = check_and_cast<cTextFigure*>(canvas->getFigure("lasthopcount"));
//更新文本
textFigure->setText(label);}文件中用
cTextFigure这个 class 代表 figure。figure types有很多种,所有都是继承自cFigure的子类。我们在得到hopCount变量之后,即可写入代码并更新文本。对上文代码的解释,我们要在 network 的 canvas 上画 figures,
getParentModule()函数返回这个节点的父 module,比如 network。getCanvas()函数返回 network 的 canvas,getFigure()可以通过 Figure 名得到figure。之后我们用setText()函数更新 figure 文本。当我们运行仿真时,在第一个消息到达前,figure 会显示 “last hopCount:N/A”。之后,每当一个消息到达它的目的地时,这个文本都会更新。
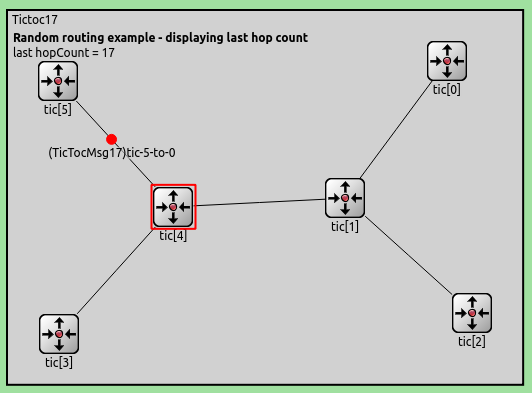
-
如果对布局不满意,比如figure文本和节点重叠在一块了,可以点击“re-layout”

Tictoc 18
-
哑铃型的网络拓扑结构,两端各两个节点连接,中间
numCentralNodes个节点连接。中心节点数目为 4 时形状大致如下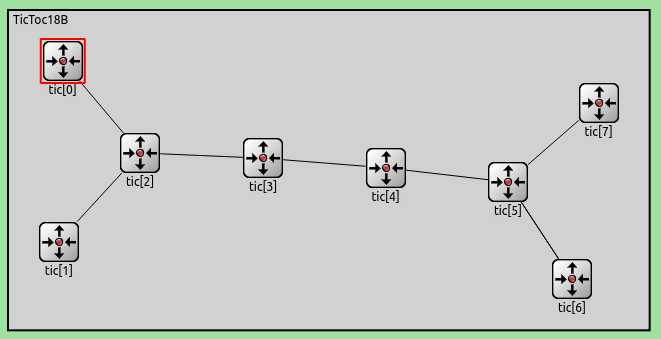
对比下面代码可能更容易理解些,for 循环前是左端两个节点的连接,for 循环则是中间多个节点依次连接,for 循环后则是右端两个节点的连接。因为 tictoc 中节点是从 0 开始的,因此右端节点连接时注意 + 1。
1
2
3
4
5
6
7
8
9
10
11
12
13
14
15
16
17
18
19
20
21
22
23
24
25
26simple Txc18 extends Txc16
{
}
network TicToc18
{
parameters:
int numCentralNodes = default(2);
types:
channel Channel extends ned.DelayChannel {
delay = 100ms;
}
submodules:
tic[numCentralNodes+4]: Txc18;
connections:
// connect the 2 nodes in one side to the central nodes
tic[0].gate++ <--> Channel <--> tic[2].gate++;
tic[1].gate++ <--> Channel <--> tic[2].gate++;
// connect the central nodes together
for i=2..numCentralNodes+1 {
tic[i].gate++ <--> Channel <--> tic[i+1].gate++;
}
// connect the 2 nodes on the other side to the central nodes
tic[numCentralNodes+2].gate++ <--> Channel <--> tic[numCentralNodes+1].gate++;
tic[numCentralNodes+3].gate++ <--> Channel <--> tic[numCentralNodes+1].gate++; -
指定中心节点的数量 N 从 2 到 100,步长为 2,产生 50 次仿真;
为了提高仿真准确度,我们需要用不同的随机数运行多次运行相同的仿真。这样的运行称为 Repetitions 并且在 ini 文件中加以指定:
1
2*.numCentralNodes = ${N=2..100 step 2}
repeat = 4每个仿真都要被运行4次,每次都有不同的 seed。这可以提供更多的样本,使结果更加平均。重复的越多,结果将会越来越变成期望的结果。